[Updated QT - Dewar Cooldown ]Update
Dewar Cooldown Procedure
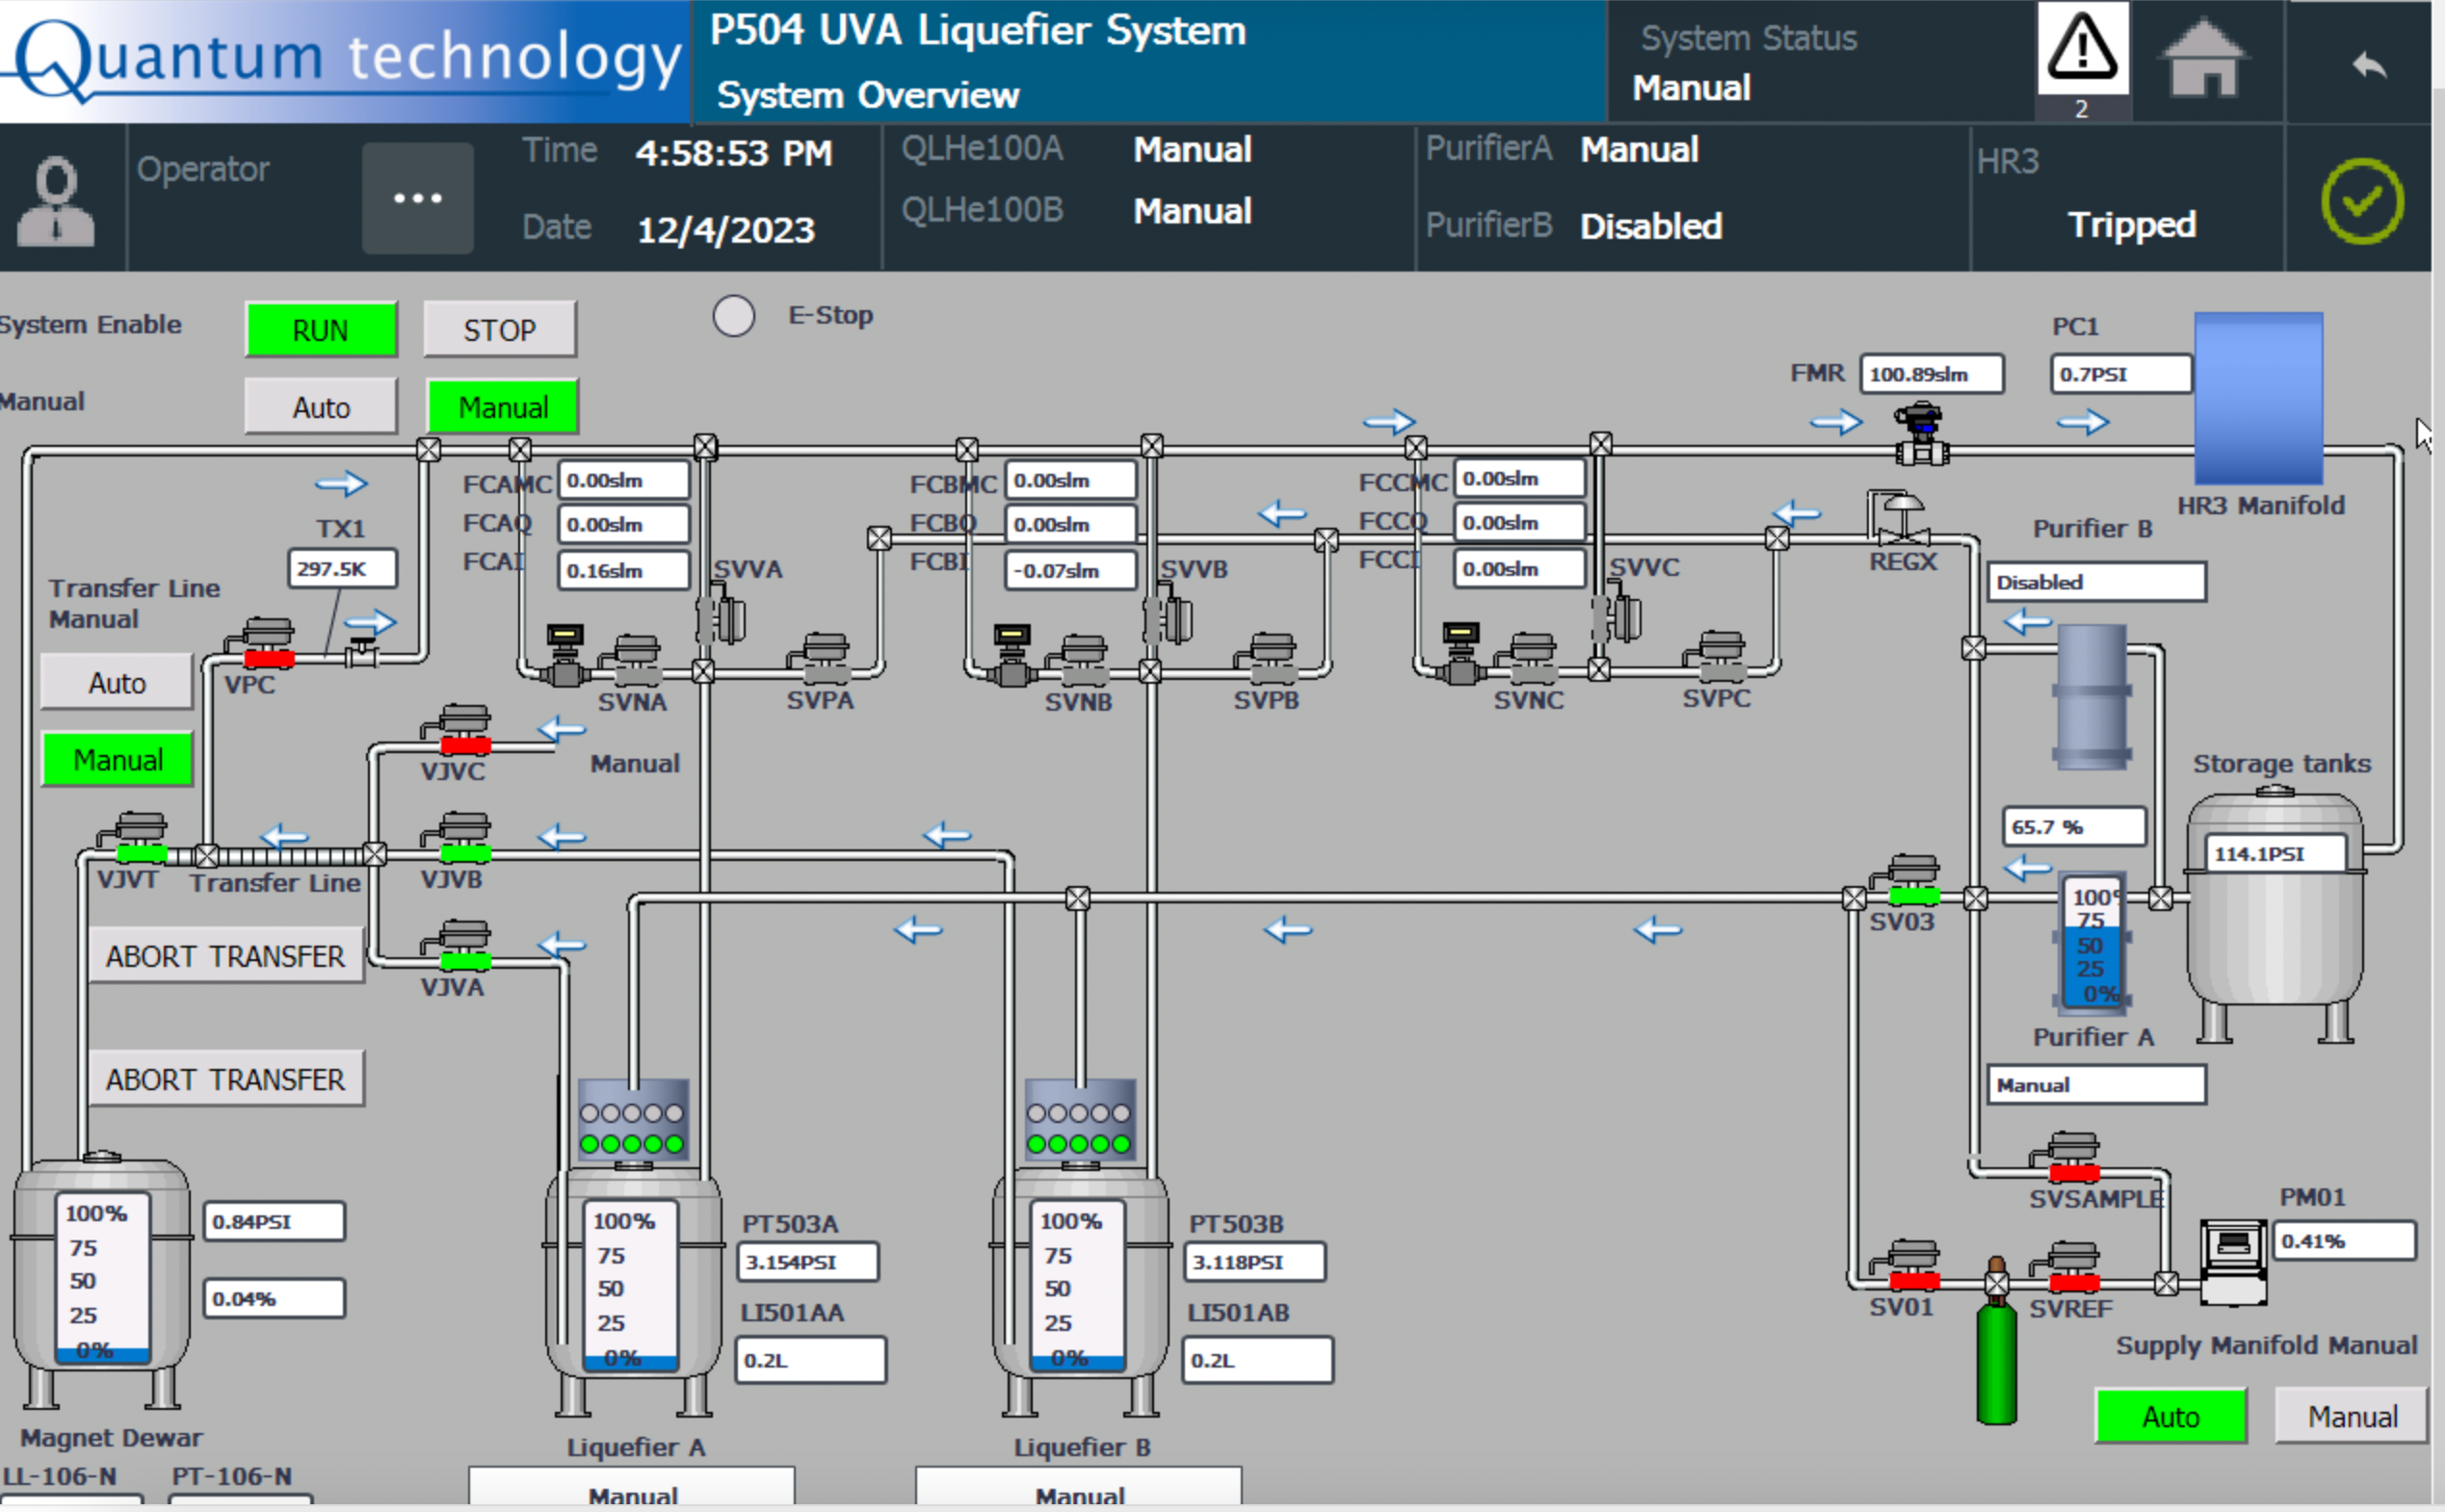
- Check Operational Configuration of all the valves and ensure all of them are in the nominal configuration (if not, contact the expert(s) before starting the cooldown)
- Check the LCW supply and ensure there is no issues with LCW parameters.
- Check all the coldhead compressors' screens and ensure there are no "ALARMS" on their display panels. Also, check the two gauges and ensure both gauges show ~200 psig (these are inlet, outlet pressure readings in/out the coldheads).
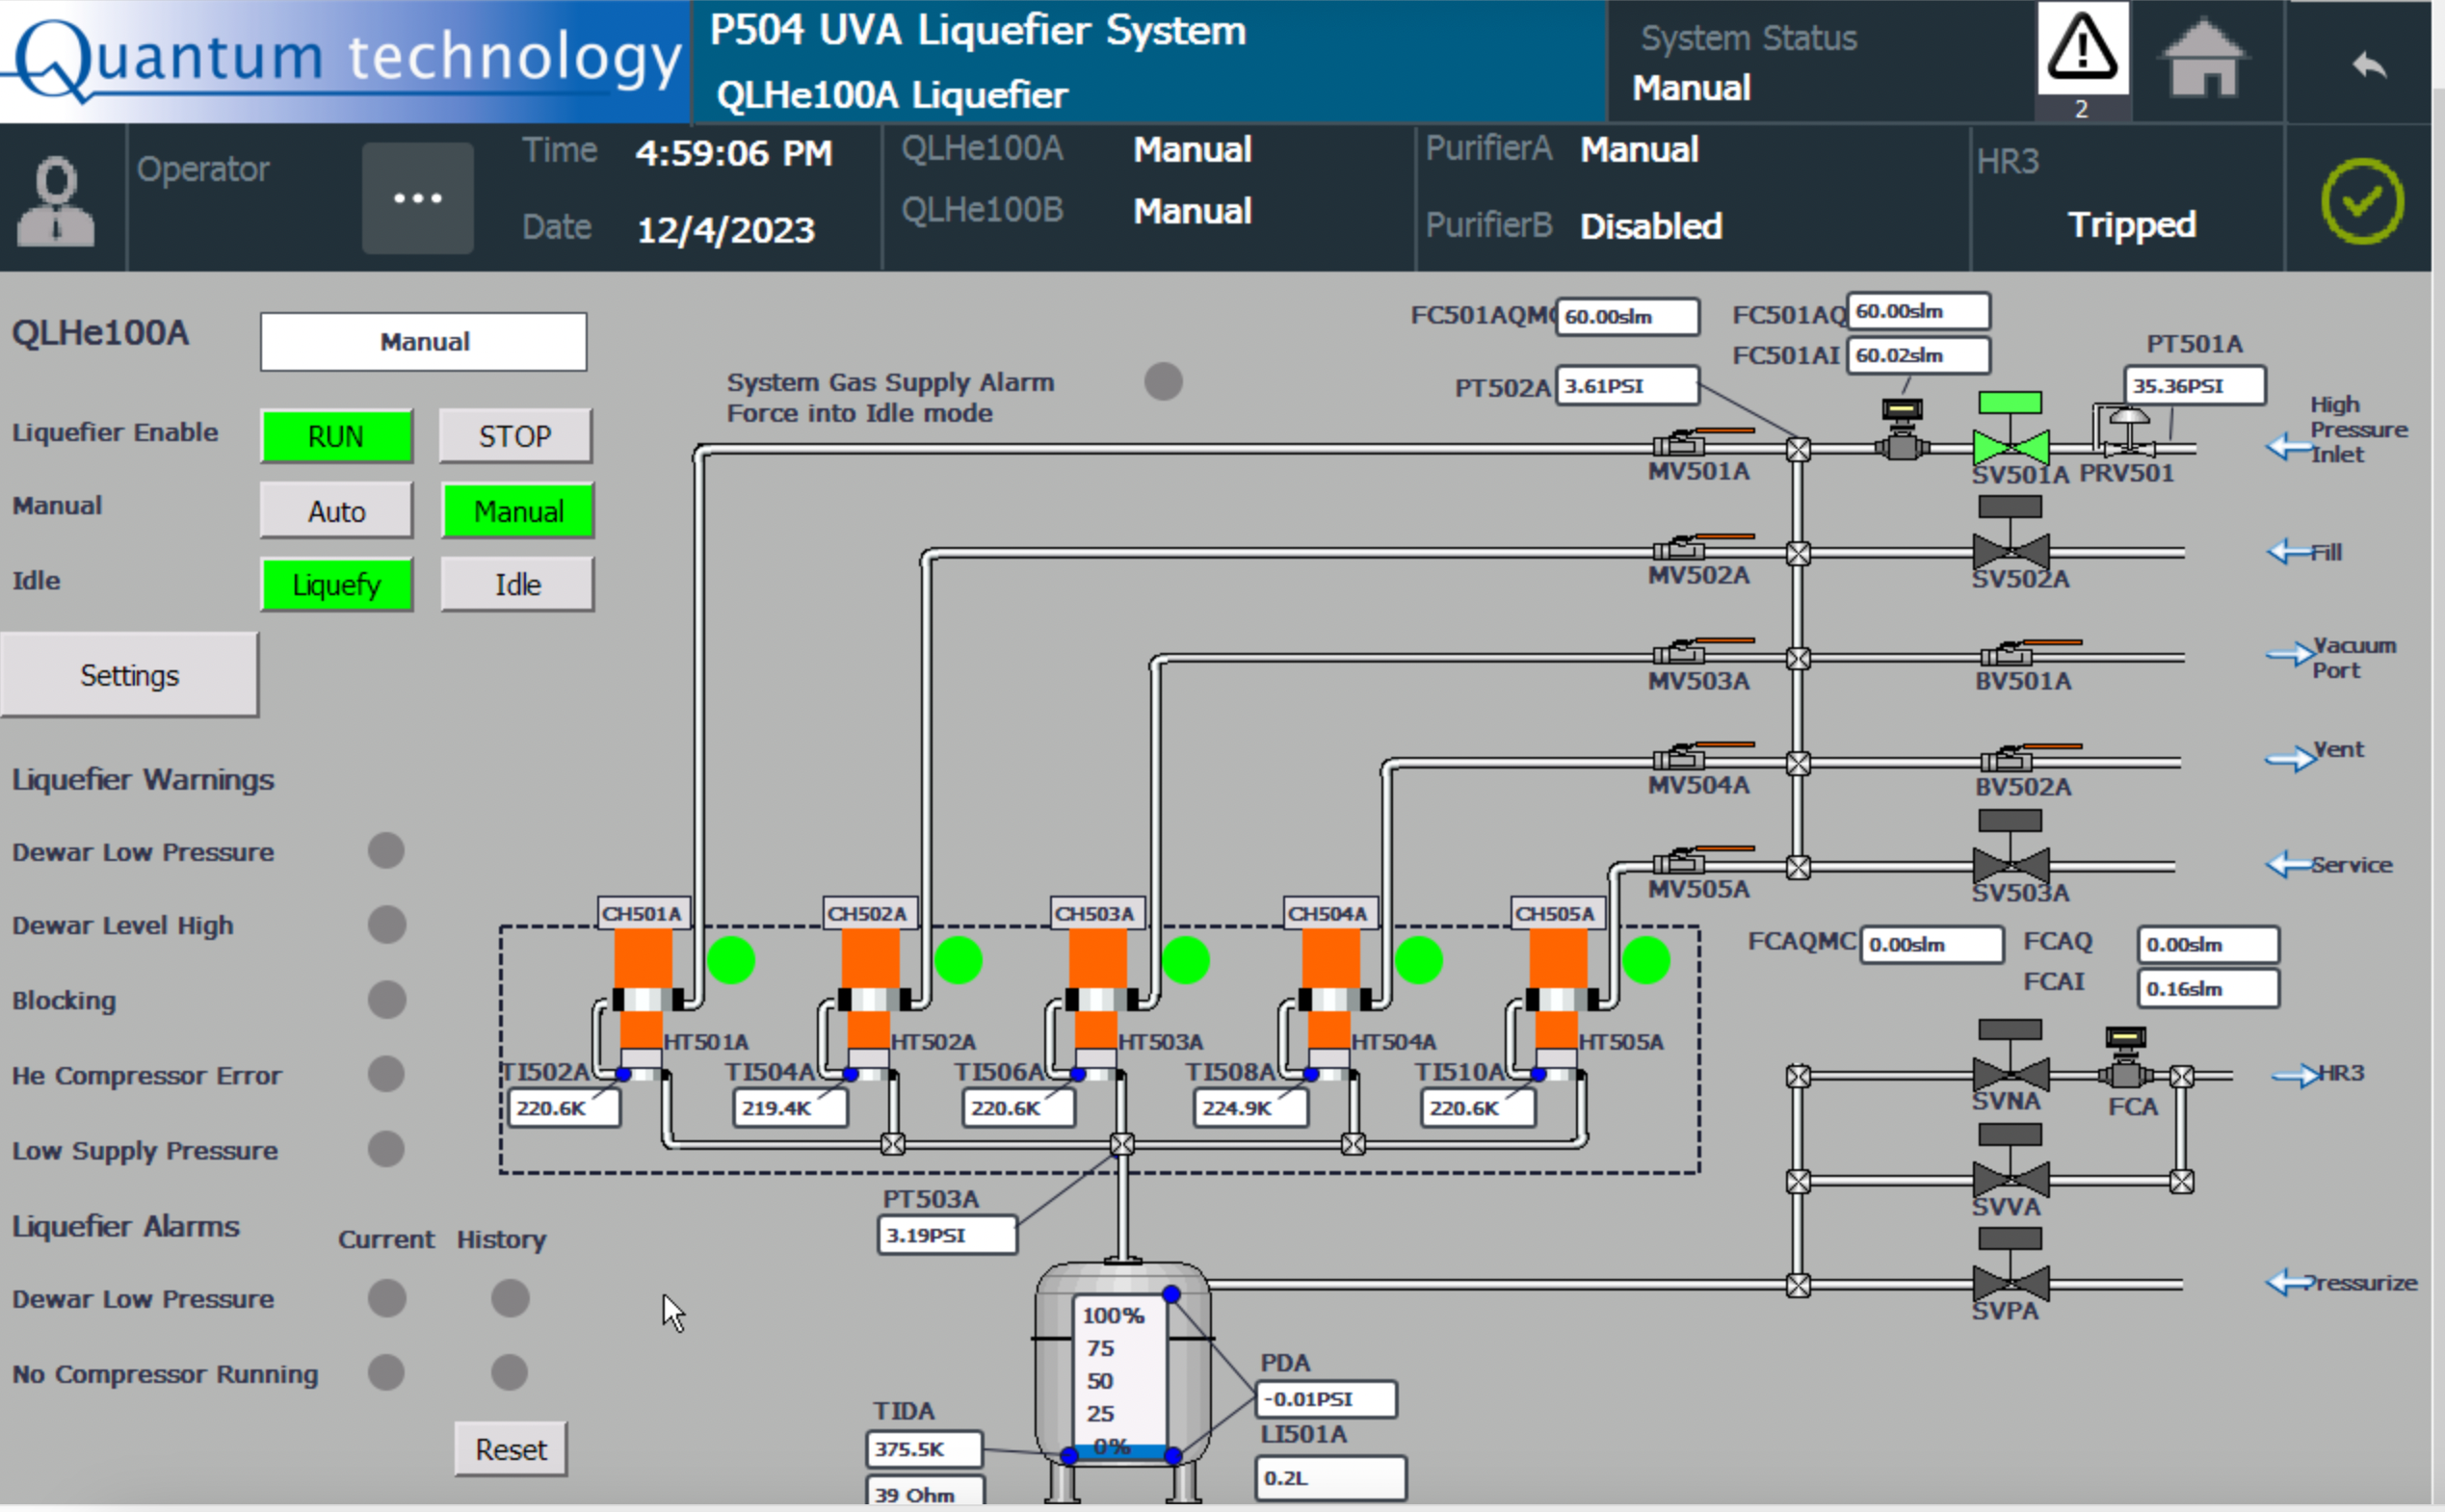
- Switch the LIquefier to Manual + Liquefy mode (Manual + Idle mode is also the same because Liquefy/Idle option has no effect when it is in the 'Manual' mode)
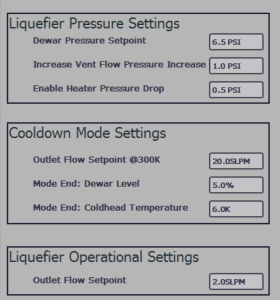
- Ensure the dewar pressure alarm threshold is around 0.2 psi (navigate to the Liquefier 'Settings' to check that).
- Set the inlet flow to 60slm: enter 60slm on FC501(A/B)Q (then press enter)
- Open VJV(A/B), VJVT, open Magnet Bypass control valve to 70% have the flow through the magnet. You will observe the Dewar pressure will drop down to ~1.2 - 1.4 psig.
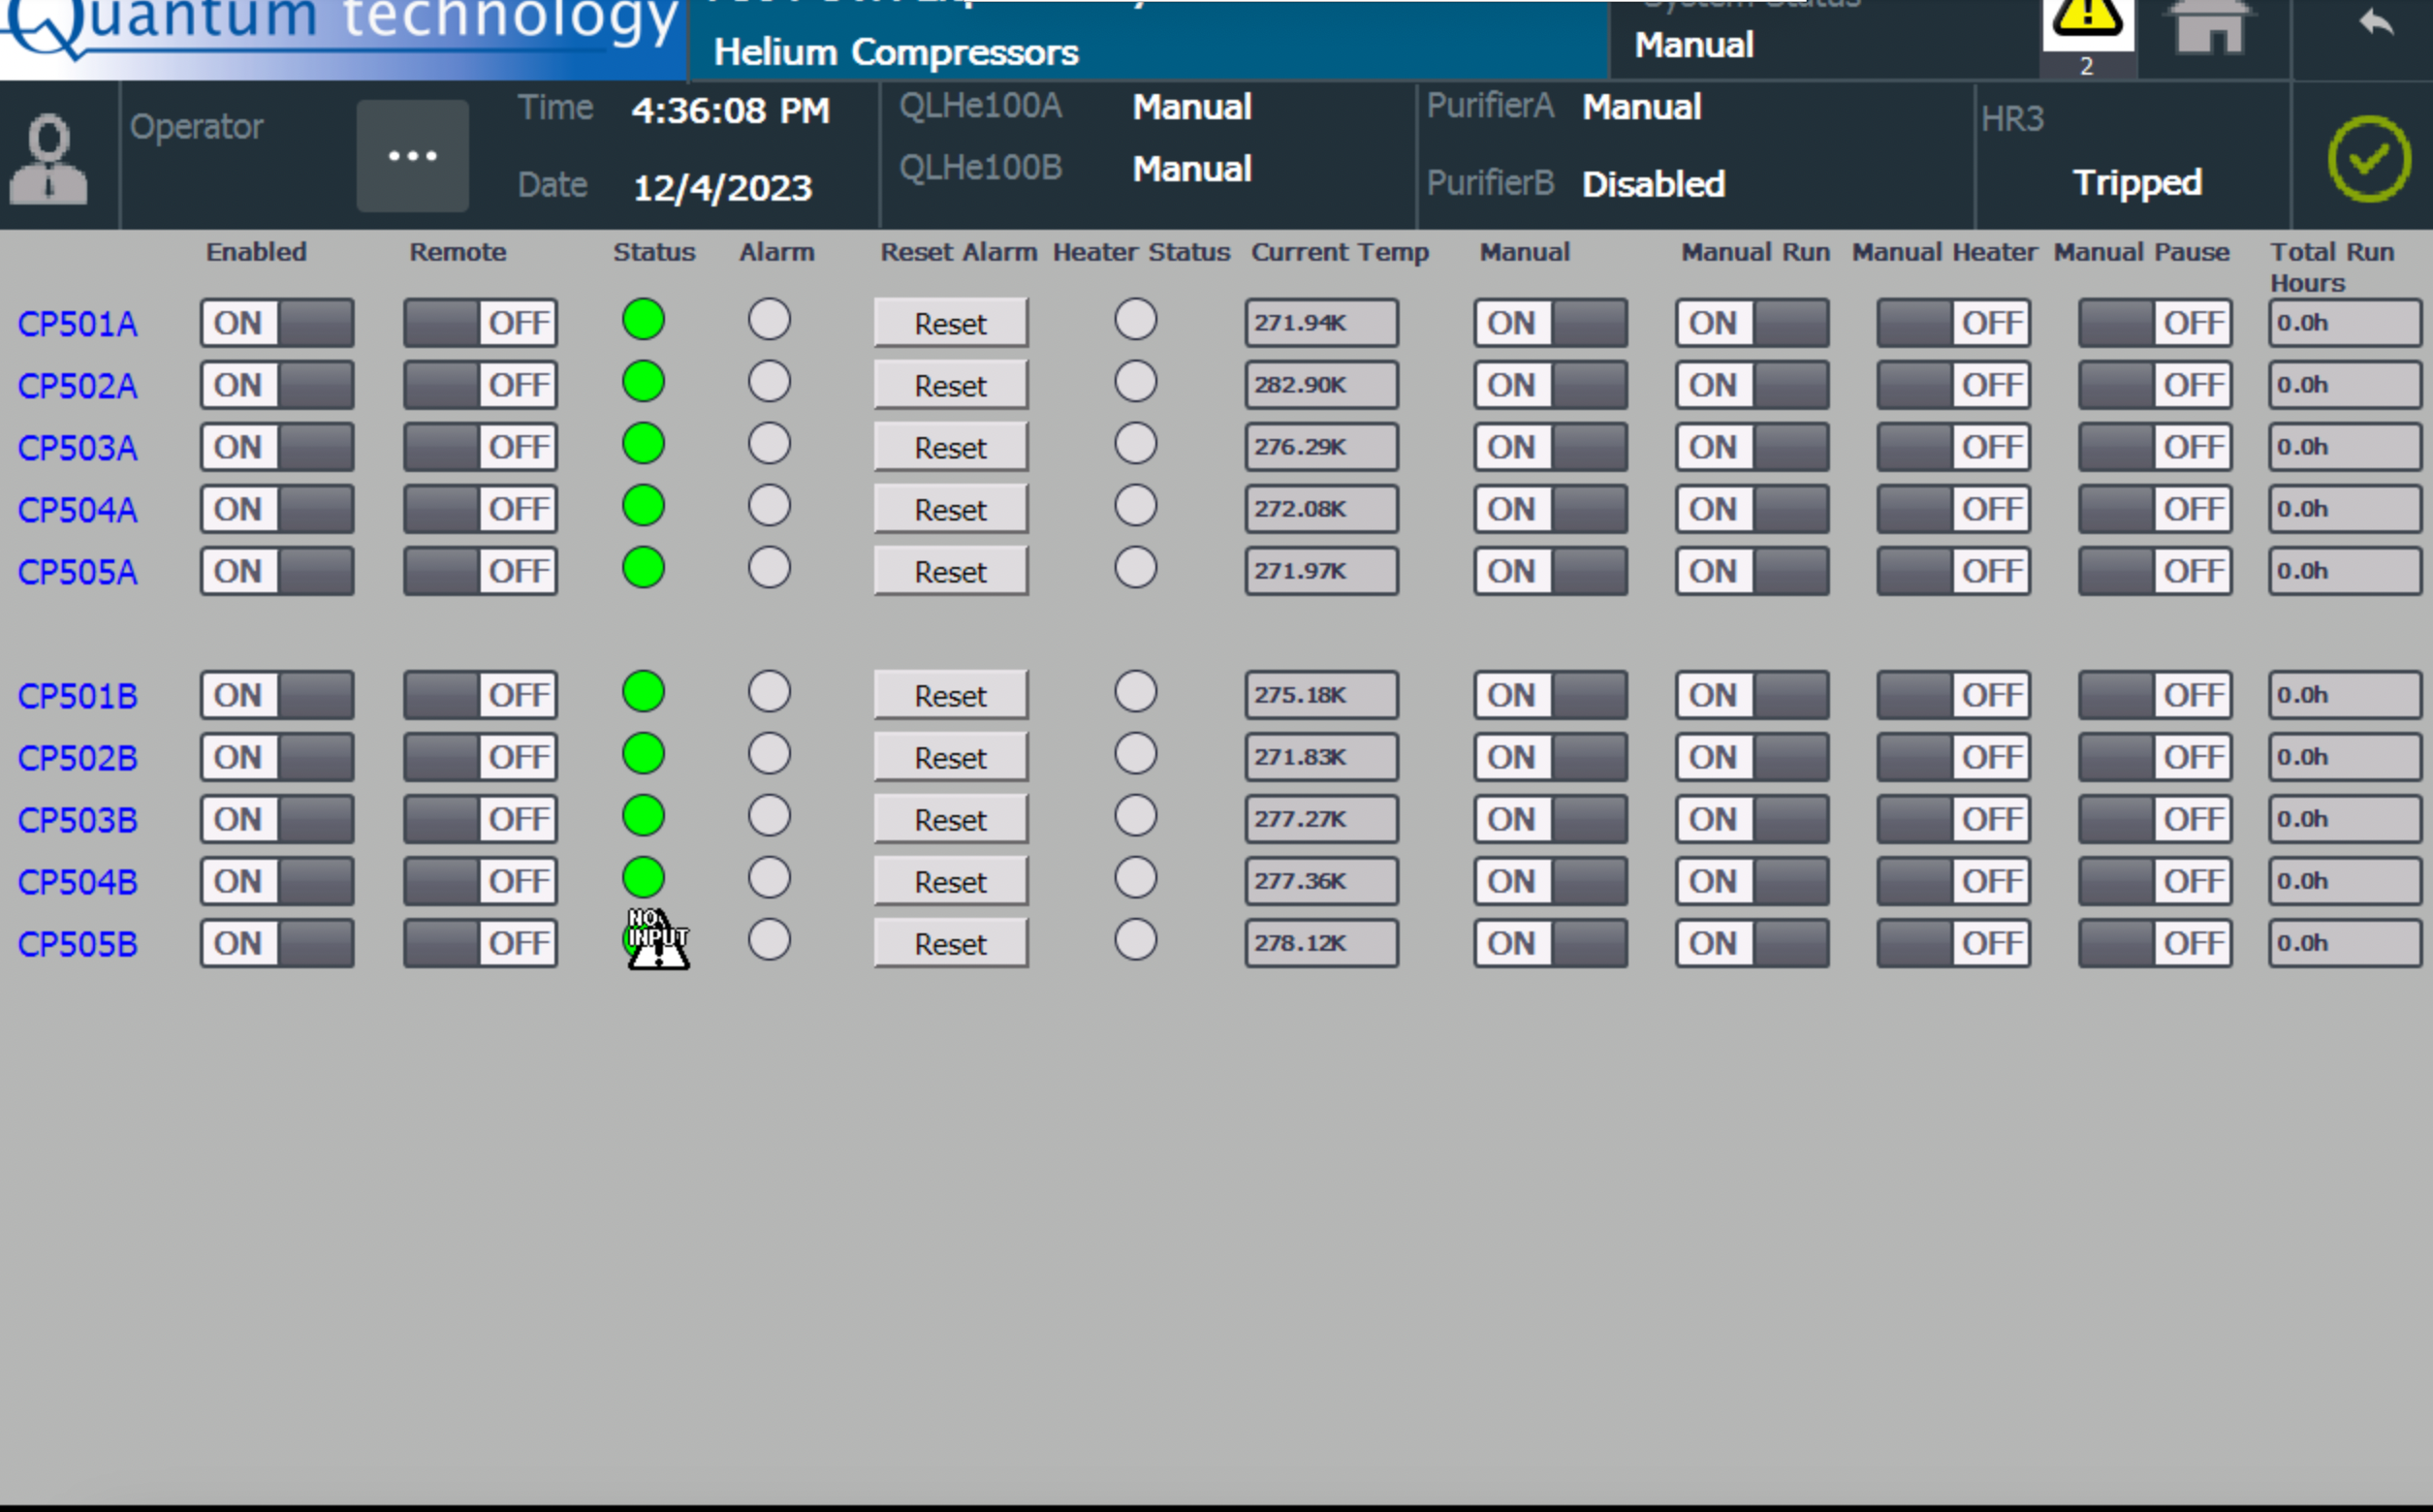
- Turn ON the cold heads manually on "Helium Compressors" screen (double click on "Manual Run" button on each coldhead compressor).
- Move the transfer stinger a few inches up (to avoid touching the bottom).
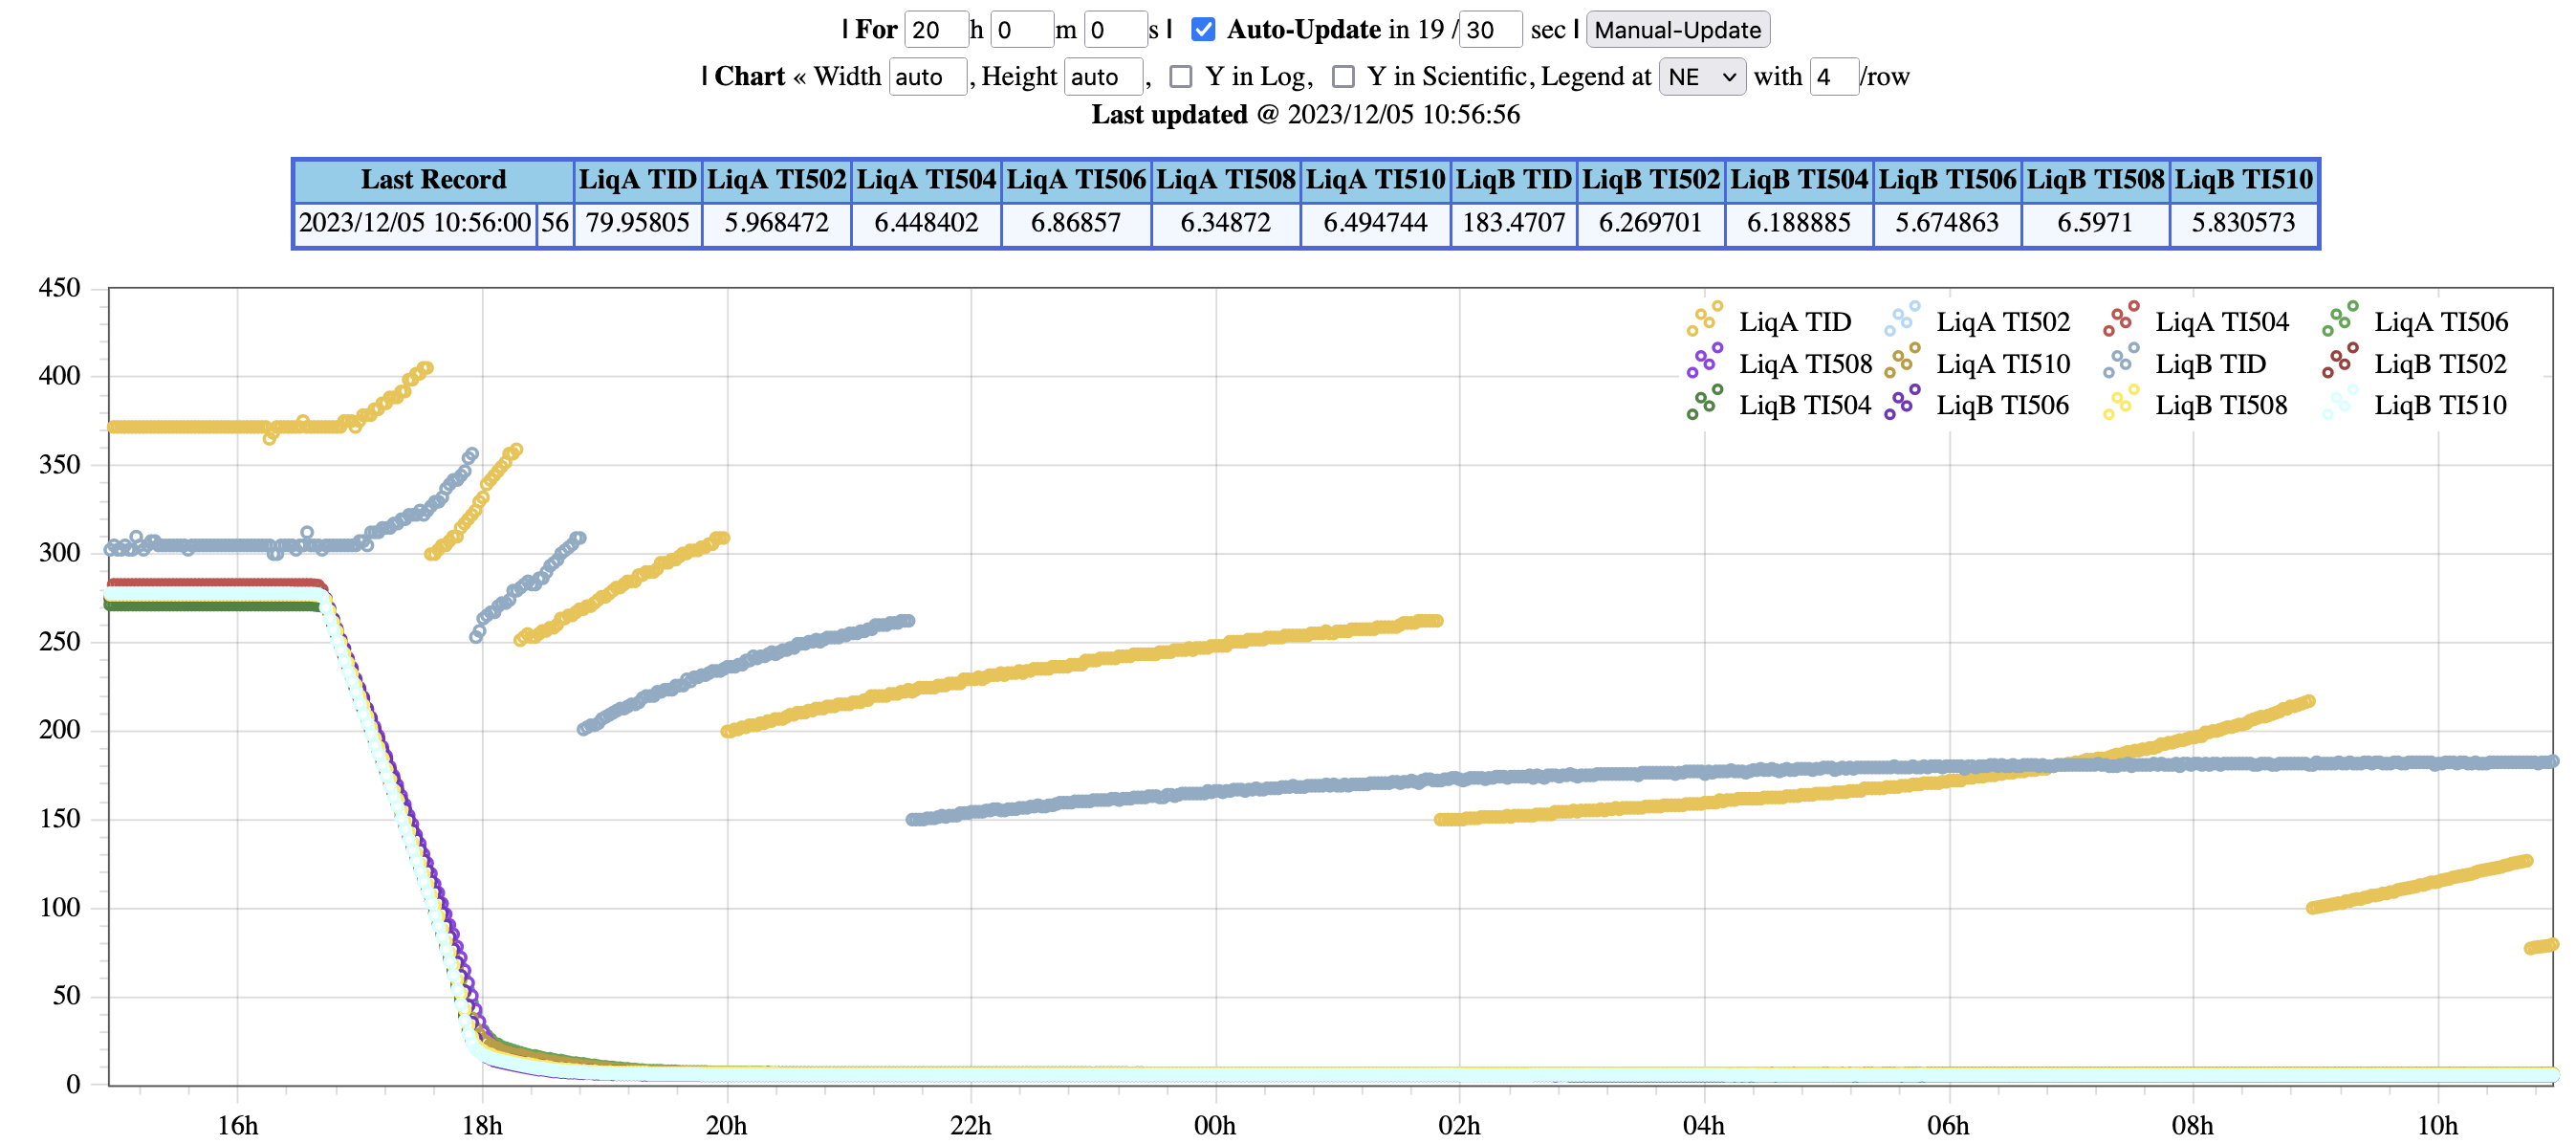
- It will take about 2 hrs and 30 mins for the cold head temperatures to reach ~5-6 Kelvin.
LQ- A
LQ-B - Monitor A,B's TI502,TI504, TI506, TI508, TI510 and TIDA/B and you will observe all of them will have a slope towards 4 Kelvin (TIDA/B will be a bit slower in rate of cooling down compared to coldhead temperatures)
- Once cold head temperatures reach 4-5 Kelvin, and TIDA/B reach their lowest (around 10 Kelvin: equivalent to ~324 Ohm), then you are ready to transition from "flowing through transfer line" to "flowing through regular outlet path of the Liquefier", i.e. the outflow through SVN(A/B) (with the flow controller) set to 60slm. Note: you may have already noticed that the FMR flow started reducing which is a good indication of LHe production. Don't worry if you don't see that. Proceed to the next phase.
- Close VJVA, Close VJVB, Close VJVT, and open VPC. Then, Open SVNA/B and set FCA/BQMC to 60slm. Ensure you inlet flow to the Liquefier is 60slm in this Manual mode.
- Let/Ensure the Dewar pressures are ~6.5 psig. If not, close SVNA/B temporarily to build the pressure to ~6.5psig and then open SVNA/B.
- Let the Liquefier run in this configuration: in-flow 60slm, out-flow 60slm (via SVNA/B), cold-heads are running, mode: run+manual+liquefy.
- You should expect ice/frost on Dewar neck during this phase.
Optional: Open SV503A/B (Magic Valve Bypass) so then you can expect the neck will get cold faster. - When you start seeing either,
(1) the Dewar Pressure starts decreasing while having 60slm inflow and 60slm outlet flow, or
(2) FCBI start going down while FC501B inlet is 60slm,
then lower the value of FCA/BQMC to ~50slm (or lower) to stabilize the Dewar pressure around ~6.5 psig. If you realize that you will have to lower the FCA/BQMC more, then that's the indication that we will have to switch the Liquefier to "AUTO" mode.
Then, close SV503A/B (if it was opened in Step 16). - Ensure the Liquefier Settings screen to ensure the following values. You can use "Outlet Flow Setpoint" to 10slm and then after a few hours change it back to 2slm.
- Ensure, the Full system is in the RUN AUTO mode (You can skip this step if the main screen is already on "RUN+Auto" mode). See the top-left corner. When you press this "AUTO" button, you may see that the "SVSAMPLE" valve can immediately becomes "OPEN". So you will first have to click "MANUAL" button at the bottom-right corner of the following screen (to enable that section of the valves to control manually) and then close "SVSAMPLE". Also check whether the "VPC" stays "OPEN" (again, you may have to click "MANUAL" button right below the "Transfer Line Manual" (middle-left)).
- Check the compressor screen and ensure "Remote" buttons are "ON" for each coldhead.
Ensure the Dewar Pressure is around 6.5 psig. If not, pressurize the Dewar pressure by reducing FC(A/B)QM while the inlet flow is 60slm. Once the Dewar pressure reach to 6.5 psig then change the outlet flow back to its previous value.
At this stage, the "Manual Run" is ON because you have been running the Liquefier on MANUAL+Liquefy mode. So, it is fine to leave the "Manual RUN" "ON" while you switch to "AUTO" in the next step (remember to turn them OFF on the following screen whenever the Liquefier is switched back to MANUAL mode). - Set the "Outlet Flow Set Point" to 10slm in the "Settings" screen
Switch the Liquefier to Run + Auto + Liquefy mode by just pressing the "AUTO" button in the middle of the top-left-panel of the Liquefier screen. - The liquefier will take about ~1 hr to start producing liquid from the time it was switched to the Run + Auto + Liquefy mode.
Note: The following plots show the nominal parameters under this configuration. Notice the Dewar level started increasing ~ 1hr since the time it was switched to the Run + Auto + Liquefy mode.
- Run in this configuration until you start seeing the increments on Dewar level. Then, change the Outlet Flow Setpoint to 2slm (nominal value) in the Liquefier's Settings screen. You will notice that FC(A/B)Q changed to 2slm.
- Check the "Dewar Level High" on the Liquefier's Settings and ensure that, it is set to 89% (~222.5L)
Liquefier A takes about ~70hrs to produce ~221L after switching the Liquefier to the "RUN+Auto+Liquefy" mode.
Use https://e906-gat1.fnal.gov/data-summary/e1039/target-par-preset/target-LHe-prod-rate.php with the period mentioned in the following plot.
- When the liquid starts accumulating, move the transfer stinger all the way down.
