Hazards Involved:
- Contains refrigerated gas; may cause cryogenic burns or injury.
- May cause frostbite.
- May displace oxygen and cause rapid suffocation.
- Flammable gas.
- Highly flammable liquid and vapor.
- May form explosive mixtures with air.
- Contains gas under pressure; may explode if heated.
- May displace oxygen and cause rapid suffocation.
- Harmful if inhaled.
- Causes severe skin burns and eye damage.
- Very toxic to aquatic life.
- Corrosive to the respiratory tract.
Safety Data Sheet for Methanol
Compress gases
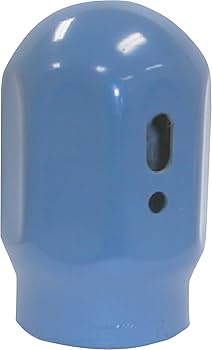
Compressed gas is used in this experiment. Nitrogen, Helium, and ammonia gas are all compressed within cylinders. Each cylinder must be properly supported either by a gas cylinder dolly, with 3 contacts on the ground and chained, mounted/chain to a rigid structure, or within a cylinder holder. The purpose of this is to prevent the bottle from tipping over and damaging the cylinder valve. If the neck of the cylinder is damage the bottle could explode. While moving bottles, have a protective cap, as shown below, to protect the valve. To transport roll on the bottom side onto a dolly.
Regulators
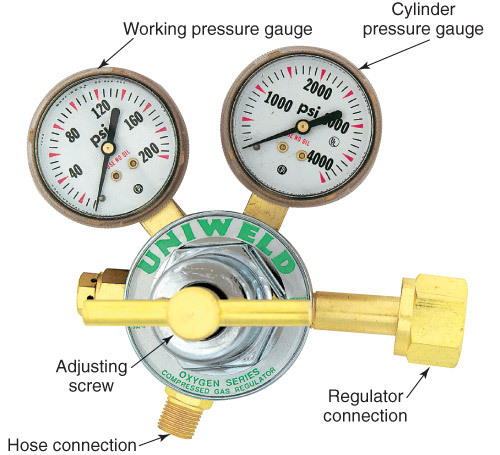
Regulators should always be used to regulate the compressed gas going into a system. Each regulator is special to the type of gas contained in the bottle. This is because different gases require different maximum cylinder pressure at which the connection is designated to be used, the gas type, and a designation of the valve outlet thread when applicable. CGA, the Compressed Gas Association, establishes the safety standards for the industrial gases industry. Each gas has a different 3 digit CGA number that match it to a certain type of regulator. The location of the CGA number is normally around the cylinder valve and inlet to the regulator.
Regulators have two gauges:
The cylinder pressure tells you how much gas is within the tank. This gauge is on the bottle side.
The working pressure tells you what pressure you set the regulator to. It won't go above that pressure. This is on the outlet side.
To increase the pressure you turn the adjusting screw clockwise. Some regulators are very sensitive and this could increase the pressure by a lot. Go slow.
Some regulators have a valve on the outlet that can be open and closed. Make sure to open this valve if you want gas to flow.
When done using the gas insure that the cylinder is close. If there is a valve insure the pressure between the outlet and working gauge is vented.
Cryogenics:
- Cryogenic liquids come with several hazards.
- Cold contact burns which produce similar effects as normal burns.
- Asphyxiation from decrease oxygen. If the oxygen levels get too low, 20%, the O2 alarm will alarm. Sudden death may occur at approximately 6% oxygen content by volume.
- Explosion from pressure build up from the boil off or from the liquidation of oxygen. Proper venting and insuring no combustible sources are near the cryogenics will mitigate this.
Due to these hazards when dealing with cryogenic liquids, you should be within a well vented space, such as a fume hood. Check the fume hood to insure that proper air flow is being maintain. Avoid opening the fume hood over the top notch.
Proper PPE for cryogens are:
• face shield or safety goggles;
• safety gloves;
• long-sleeved shirts, lab coats, aprons.
When doing cryogenic work it is normal to have one hand with a cryo-glove to allow the other hand to preform dexterous motions.
More information can be found in the OSHA Lab safety cited below.
In case of emergency push this button. To reset pull!
Chemicals:
When dealing with corrosive chemicals such as ammonia gloves should be worn. Eye protection should be worn when mixing or pouring. All chemical mixing should be done within the fume hood and a waste beaker should be placed nearby. All waste should be disposed of properly.
Supplies:
Gases: Nitrogen, Helium, Target Material
Liquids: Methanol, Nitrogen, isopropyl alcohol
6 small nalgene bottles
Hole punch and hammer
Beakers: 1 large for waste and 1 medium for isolation
Vat to hold Liquid Nitrogen.
Storage Dewar with Liquid Nitrogen
Dewar Flask to hold cryogenic liquid
A pouring flask (Yeti mug)
Cryostat (Described below) with KF and Swage line
A pump to create a low vacuum space
A scoop for moving the material
Tweezers and Thongs
A marker for labeling
Shieves: 1 handheld and 2 Shieves for crushing into 2mm chunks
Pestle for crushing
Setup:
The setup includes a pump that is capable of low vacuum, prefer high vacuum, gases for backfilling/ pump and purging contaminates, and a cryostat.
Swage Stainless steel tubing is prefer over plastic tubing to avoid contaminates leaking into the system from cryopumping. Cryopumping is a vacuum process that pulls a vacuum by condensing gases along a cold surface, such as the cryostat. This is only effective for certain gases. The effectiveness depends on the freezing and boiling points of the gas relative to the cryopump's temperature. Due to the high cryopumping that occurs in the target production, contaminates can be pulled through the pours of the plastic tubing.
Isolation Valves need to be used to isolate the pump from the purge gas line and the cryostat line from the pump. A pressure gauge should be between the gas and the cryostat to monitor the pressure within the cryostat. Below are sample photos of the setup at UVA.
Thermal Couple:
On the windows machine their is a program for the thermal couple called "U3 AIN-Temp 200-0C type K with buffer.vi" in labview.
Click the run continuously button to start the measurement.
Insure that the resistor is connected properly or the temperature reading will change wildly.
Method:
Clean and Backfill:
Clean and connect all parts of the system. While connecting, slightly pressurize with nitrogen or helium to back fill the system, this aids is removing contaminates.
Insure that there is no leaks by bringing the system to a vacuum, -30 mHg and confirming a non-pressure change over time, prefer overnight minimum 5 minutes.
Pump and Purge cycles:
Do this while the cryostat is warm.
When no leaks are confirmed we can start the pump and purge process. This is to remove contaminates within the cryostat to improve the packing fraction and dilution factor. Depending on the level of vacuum you have you will need to pump and purge X amount of times to remove all contaminates. At UVA we normally do this cycle 5 times. 3 Times with nitrogen and 2 with helium, ideally all with helium. Nitrogen is used as it is cheaper, will remove any water vapor, but must be followed by helium to remove any leftover nitrogen.
The process is to actively pump down the cryostat for 5 minutes. If using a plastic tube, as seen above, isolate the metal swage with a valve, then isolate the pump by closing the pump valve and open the purging gas regulated at 6 psi. Once the proper psi is reach, isolate the line, close the gas, and open the pump again. Remember to open the line completely to pump down on the cryostat.
Repeat this process 5 times.
Prepare the Cold Bath:
Pour liquid methanol into the dewar flask halfway. Add nitrogen as mixing until the methanol becomes a slush. All more methanol to the correct level to submerge the cryostat below the KF Clamp.
Once the bath is thick add the thermal couple to the bath, The bottom of the bath should be -94 C and the top should be -92 C at the start. Keep the thermal Couple at the top.
Maintain a temperature of around -95 C.
Methanol freezes at -97 C.
Insert the cryostat into the bath and cool it down. Set the gas pressure to 9 PSI and slowly introduce the gas to the cryostat.
You should hear a hiss indicating a strong flow of gas. As gas is being pumped into the cryostat the temperature will change. Maintain a temperature around -90 C.
Balance pressure and temperature, maintaining a pressure between 6-9 PSI and temperature around -90 C until the pressure stops changing, the temperature wildly change, or the hissing stops. This mean the cryostat is full.
Prepare for removal:
To remove the crystat, insure all gas is off and remove the KF clamp breaking the seal.
Have everything prepared first:
Vat with LN2, sieves, pastel, tools to handle material, gloves, beakers, bottles with holes and caps with holes that are labeled.
Labels should be: Material, production method(crystal, glass, etc), date made.
With a waste beaker 3/4 full of LN2 pour any liquid from the cryostat and put in the back of the fume hood. Use a glass stir rod to puncture the center of the cryostat to insure all liquid gets removed.
Liquid Ammonia evaporates very quickly and can cause chemical burns!
Stack the sieves inside the ln2 vat so that the smaller one is on the bottom (No.16) and the 2mm one is on top (No.8).
Insure that there is enough LN2 that it reaches to halfway of the top sieve.
With a glove hand warm up the cryostat over the sieves. This will take some time and liquid will start to drip. Watch out!
Once the material has release from the cryostat there will be a lot of vapor. Take notes of the amount and how clear the crystal is.
Start crushing up the material into the bottom sieve. The bottom sieve is to catch the material!
Transfer of Material:
To transfer the material keep this in mind. You want to keep the material as cold as possible, the material shouldn't be outside cryogenic liquid for longer than 10 seconds.
Attatch a wide mouth funnel to a labeled bottle with holes. Place this bottle into a medium beaker and pour Ln2 until it reachs 3/4 of the bottle.
You can now use a scoop to move the material into the funnel, pour a little bit of LN2 to wash leftover of the material down into the bottle.
If transfering from bottle to bottle, wash the old bottle out with ln2 over the funnel.
Fill bottles up the the neck!
If you drop any material in the bath, try to collect as much of it as possible with the hand held sieve while insuring only material enters the bottle.
Keep the bath clean and don't allow contaminates into the bottle!
Place information into the inventory and into a storage Dewar:
Each Dewar has a number, 6 slots, and each slot can hold 3 bottles.
List the material name "ND3" or "NH3", etc.
List Y or IRR if irradiated and the year/ place, List N if not.
Add notes about production process, color, and how full the bottle is.
This tells us how many bottles of nh3 and nd3 we have.


