...
View file name Magnet_LHe_Fill_Checklist.docx height 250 View file name Magnet_LHe_Fill_Checklist.pdf height 250
Previous Version
Magnet_LHe_Fill_Checklist.docx
Magnet_LHe_Fill_Checklist.pdf
Preparation:
- About ~3 hours before the fill, select the Dewar (A or B) to perform the fill (based on the current available LHe levels).
- Set the “Dewar Set Pressure” to 3 psi on the QT HMI Liquefier A/B screen’s “Settings” page.
- Check the outside gHe pressure and make sure it is below 90 psi. If it's equal, near, or above, then relieve its pressure down to ~80 psi.
- Check with Target Expert on Shift whether the REGX green hand valve is fixed to some pressure during the previous fill.
The cave for insulation on cryostat with fans. - Open the Connect to the “Cryo Control Panel” on the cryo-computer, or connect Connect to the Cryo Control Computer (via VNC: see Polarized Target System for SpinQuest at FNAL for the instructions)
- Monitoring screens during the fill
a) "Transfer-Line Cool Down" : During the pre-cool
b) "LHe Transfer": During the fill
Procedure:
Liquefier Manual Mode Fill
- tart pre-cool phase: Open VPC → Open VJV(A/B) → Monitor TX1, TX2, TX3
a) Charts of TX1, TX2 & TX3: https://e906-gat1.fnal.gov/data-summary/e1039/target-par-preset/cool_down.php
b) TX1 goes down below 100 K in 10 If not, there may be a problem with the transfer line. If this is the case, then don’t proceed. Close VJV(A/B) and leave VPC open to boiloff an LHe trapped in the transfer line. - After ~10mins:
a) Open the Magnet Return flow, by changing the flow mode to "OPEN" on the "vi" on the Cryo Control Panel, and
b) Open VJVT on the HMI screen. - After ~2mins: Close VPC and monitor magnet pressure.
- After a couple of minutes, you will observe that the magnet pressure drops down suddenly and stay around ~1.4-1.5 psi (this indicates that LHe is flowing to the magnet after the pre-cooling of the last part of the transfer line).
- Switch the Liquefier to “Manual” mode.
- Open SV501 A/B, and you will see the field FC501(A/B)QMC gets enabled.
- Set the flow on FC501(A/B)QMC to 60slm and monitor the Dewar pressure on PT503 A/B and set the flow down to 35slm and keep adjusting it until Dewar pressure is close to 5psi, and leave it with that flow.
- Keep monitoring the liquid amount and the pressure at https://e906-gat1.fnal.gov/data-summary/e1039/target-par-preset/transfer.php.
- Fill the magnet until the level shows ~45%.
- Stop the fill if the level reached ~45% or any sudden change occurred during the transfer indicating a problem. Open VPC Close VJVT Close VJV(A/B)
- Navigate to the liquefier page on the HMI screen and close SV501(A/B) → Switch the Liquefier to "Liquefy mode", and then set back the “Dewar Set Pressure” to 5 psi in its “Settings” screen.
- Change the mode of the Magnet Return flow from "OPEN" to "AUTO" on the THCD_401_Main.vi , and then click the "Automation" toggle switch.
- Make sure that you leave the VPC open, to capture all the boil-off from the transfer line until it is warm (check TX1).
- Check the cave for insulation on cryostat because we are not allowed to use heat tape yet (to the date).
After the fill:
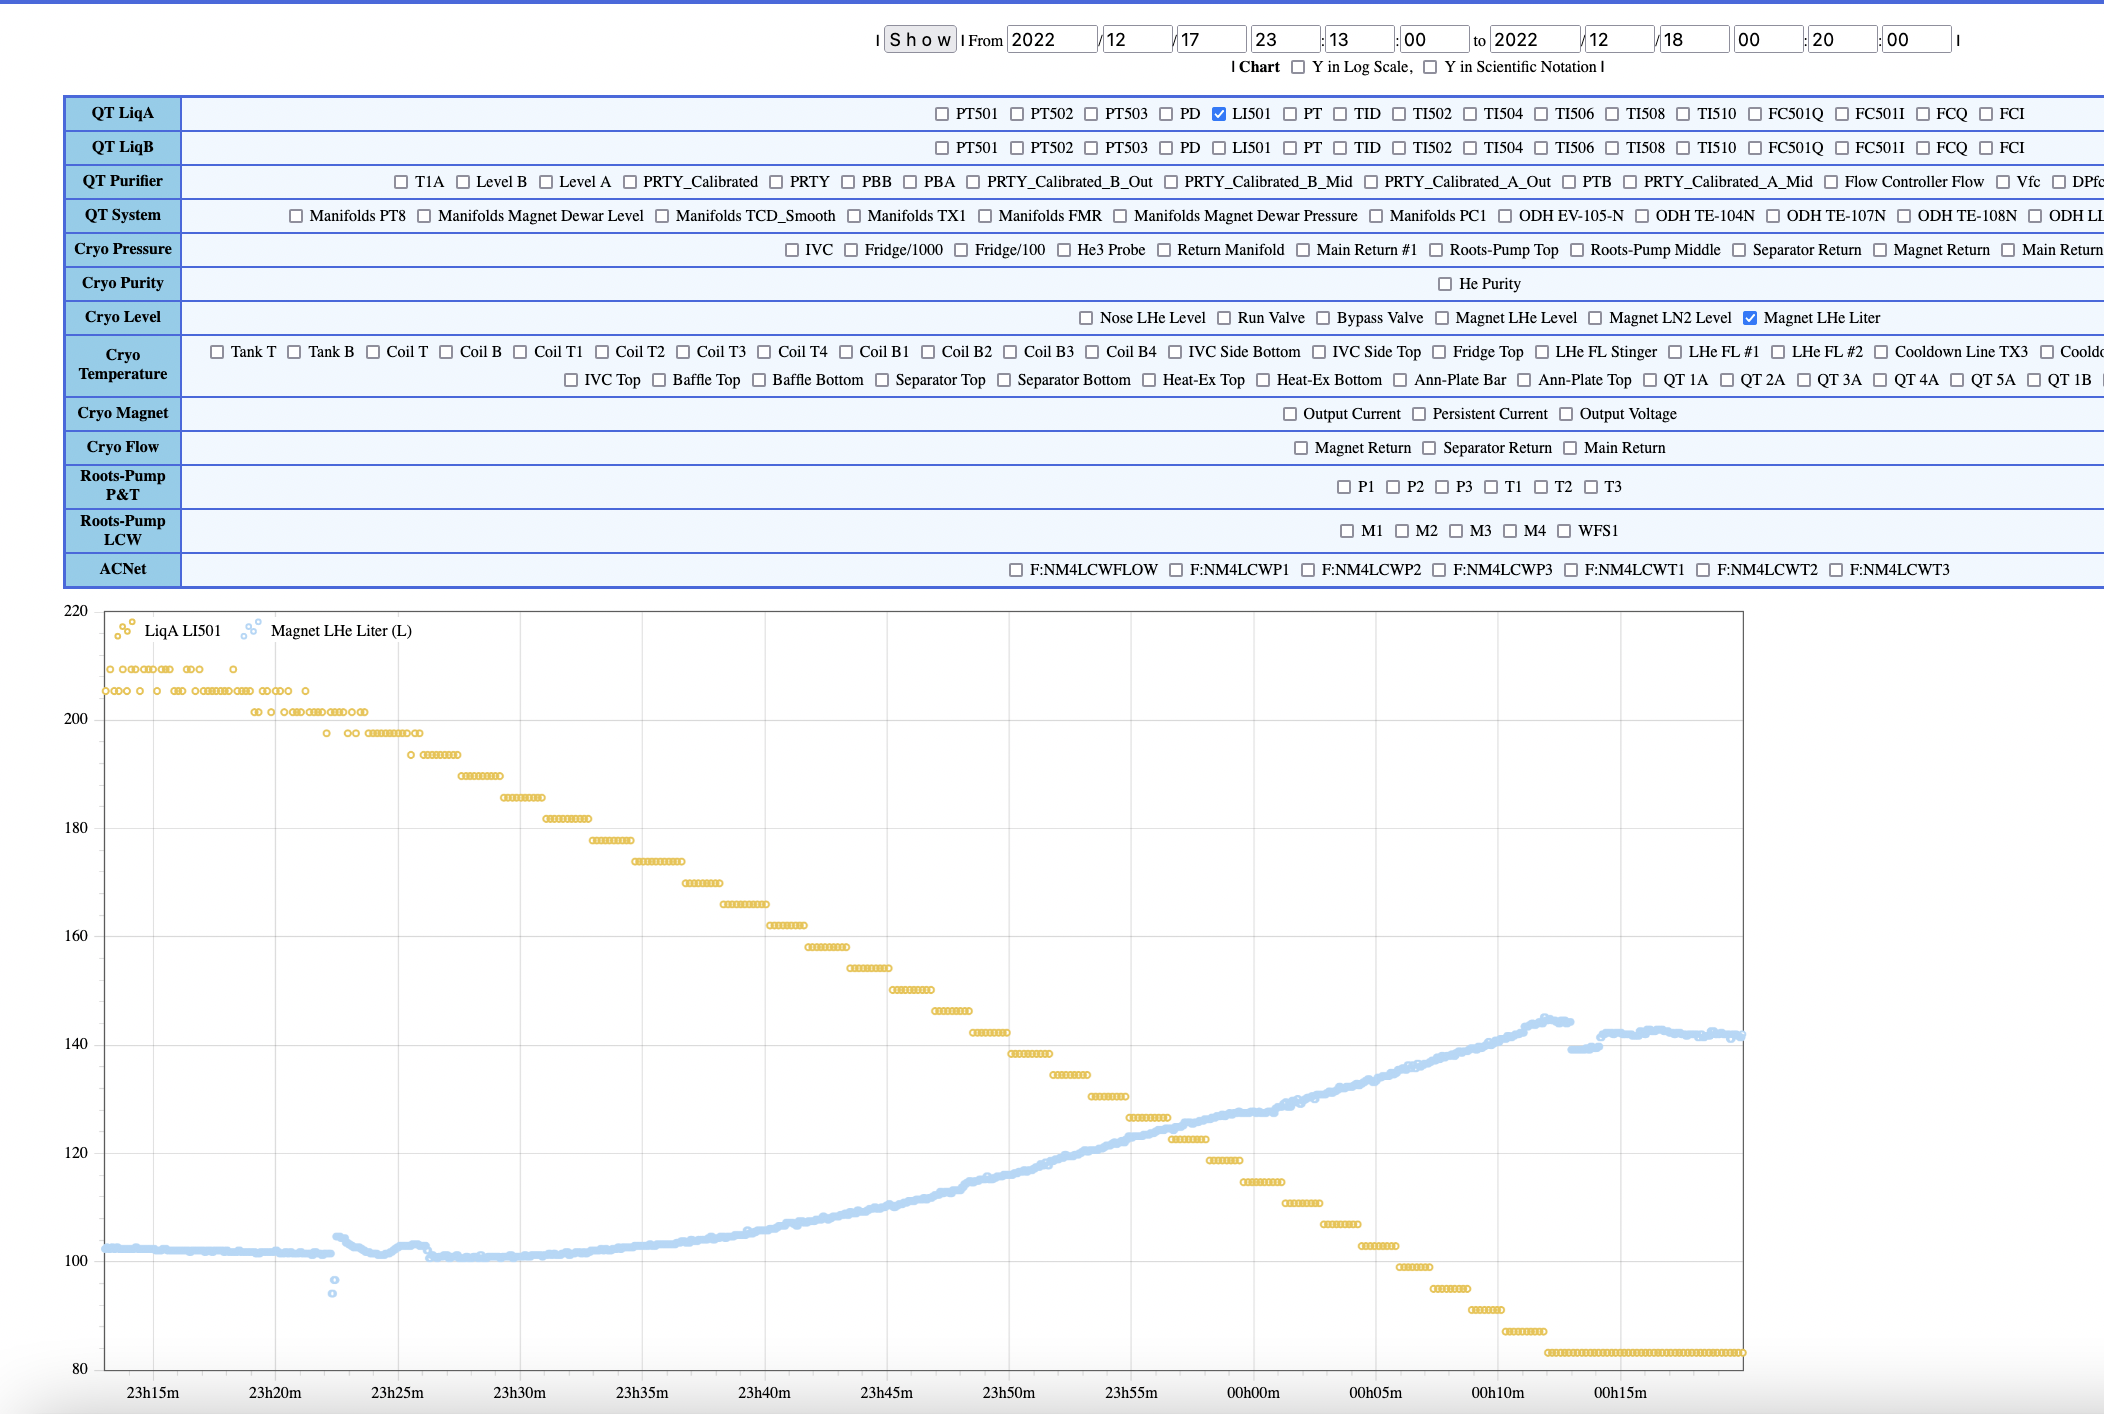
- Calculate the transfer efficiency of the transfer using https://e906-gat1.fnal.gov/data-summary/e1039/ (see the following screenshot as an example), and write an elog entry on UVA elog.
- Get the parameters from the following link and save to a .csv file and upload to this folder: https://myuva.sharepoint.com/:f:/s/as-physics-poltar/EgobRQW36kREh2PaniByVSYBBpd93dpoUaayUJtI4YMSmA?e=aEf8bw
Parameters for LQ_A: https://e906-gat1.fnal.gov/data-summary/e1039/target-par-table.php?Y0=2023&M0=01&D0=22&h0=22&m0=12&s0=00&Y1=2023&M1=01&D1=22&h1=23&m1=30&s1=00&par0=DLLiqA0_Liquefier+A+PV_PT503&par1=DLSystem0_Helium+Supply+and+Return+Manifolds+PV_Magnet+Dewar+Pressure&par2=DLLiqA0_Liquefier+A+PV_LI501&par3=Cryo+Level_Magnet+LHe+Liter&par4=DLSystem0_Helium+Supply+and+Return+Manifolds+PV_FMR&par5=DLSystem0_Helium+Supply+and+Return+Manifolds+PV_TX1&par6=Cryo+Temperature_Cooldown+Line+TX2&par7=Cryo+Temperature_Cooldown+Line+TX3
Parameters for LQ_B: https://e906-gat1.fnal.gov/data-summary/e1039/target-par-table.php?Y0=2023&M0=01&D0=21&h0=19&m0=49&s0=00&Y1=2023&M1=01&D1=21&h1=20&m1=50&s1=00&par0=DLLiqB0_Liquefier+B+PV_PT503&par1=DLSystem0_Helium+Supply+and+Return+Manifolds+PV_Magnet+Dewar+Pressure&par2=DLLiqB0_Liquefier+B+PV_LI501&par3=Cryo+Level_Magnet+LHe+Liter&par4=DLSystem0_Helium+Supply+and+Return+Manifolds+PV_FMR&par5=DLSystem0_Helium+Supply+and+Return+Manifolds+PV_TX1&par6=Cryo+Temperature_Cooldown+Line+TX2&par7=Cryo+Temperature_Cooldown+Line+TX3
Previous procedure:
- Set the liquefier to "Manual" mode.
- Navigate to the liquefier page on the HMI screen.
- Open SVP(A/B).
- Navigate back to the "Overview Screen".
- Start pre-cool phase: Open VPC → Open VJV(A/B) → Monitor TX1, TX2, TX3
- Charts of TX1, TX2 & TX3: https://e906-gat1.fnal.gov/data-summary/e1039/target-par-preset/cool_down.php
- TX1 goes down below 100 K in 5 minutes. If not, there should be a problem.
- After ~8mins:
- Open the magnet-bypass valve (i.e. the black hand valve right next to the magnet flow controller),
- Open the Magnet Return flow, by changing the flow mode to "OPEN" on the "THCD_401_Main.vi" on the Cryo Control Panel, and
- Open VJVT on the HMI screen.
- After ~1min: Close VPC and monitor magnet pressure.
**************************************************************************************************************************************
** Note: If the REGX green hand valve is fixed (check with Target Expert on Shift), then do not change it: just proceed with step #10 *****
*****************************************************************************************************************************************
> If you need to change the pressure difference between the magnet and the Dewar then use the REGX all the time to maintain the pressure difference that you need (eg: ~4psi) - After a couple of minutes, you will observe that the magnet pressure drops down suddenly and stay around ~1.4-1.5 psi (this indicates that LHe is flowing to the magnet after the pre-cooling of the last part of the transfer line).
- Fill the magnet until the level shows ~44%.
- Keep monitoring the liquid amount and the pressure at https://e906-gat1.fnal.gov/data-summary/e1039/target-par-preset/transfer.php.
- Stop the fill if the level reached ~44% or any sudden change occurred during the transfer indicating a problem.
- Open VPC
- Close VJVT
- Close VJV(A/B)
- Navigate to the liquefier page on the HMI screen and close SVP(A/B) → Switch the Liquefier to "Liquefy mode".
- Wait for 1-3 minutes until the magnet pressure (on the HMI screen) goes down to 1 psi.
- Close the Magnet bypass hand valve.
- Change the mode of the Magnet Return flow from "OPEN" to "AUTO" on the THCD_401_Main.vi , and then click the "Automation" toggle switch.
- Make sure that you leave the VPC open, to capture all the boil-off from the transfer line until it is warm (check TX1). — We need not check TX1 but let VPC open, correct?Calculate the transfer efficiency of the transfer using https://e906-gat1.fnal.gov/data-summary/e1039/ (see the following screenshot as an example), and write an elog entry on UVA elog.https://e906-gat1.fnal.gov/data-summary/e1039/target-all-auto.php?hh=2&DLLiqA0_Liquefier%2BA%2BPV_LI501&DLLiqB0_Liquefier%2BB%2BPV_LI501&Cryo%2BLevel_Magnet%2BLHe%2BLiter


